Get Started with the JDBC Connector
This tutorial will walk you through how to get started accessing Kinetica with the JDBC Connector. In addition to explaining the core JDBC API best practices it will cover important functionality that is specific to Kinetica.
We will start by importing the tutorial project into eclipse and configuring the JDBC connection to use your local Kinetica instance. Next the tutorial will walk you through JUnit test cases that provide working examples that include:
- Creating a table
- Inserting and updating rows
- Querying for data
- Handling Kinetica specific datatypes
Finally, after you complete the tutorial the examples may be useful for troubleshooting issues encountered in the field.
Prerequisites
This tutorial assumes that you…
- Have a Java IDE. We will use Eclipse in the examples but others should work.
- Have access to a Kinetica 7.1 environment where you have permissions for create/insert/update of tables. If you don’t have this then you can get Kinetica Developer Edition which is free to try.
- Have familiarity with Java and SQL. When in doubt about Kinetica specific details you can review the Kinetica Online SQL Guide.
- Have access to the tutorial source code.
Setup
Project Import
The project we will be working with is located in Git and dependences are managed by Maven. In Eclipse select File->Import… Then choose Check out Maven Projects from SCM.
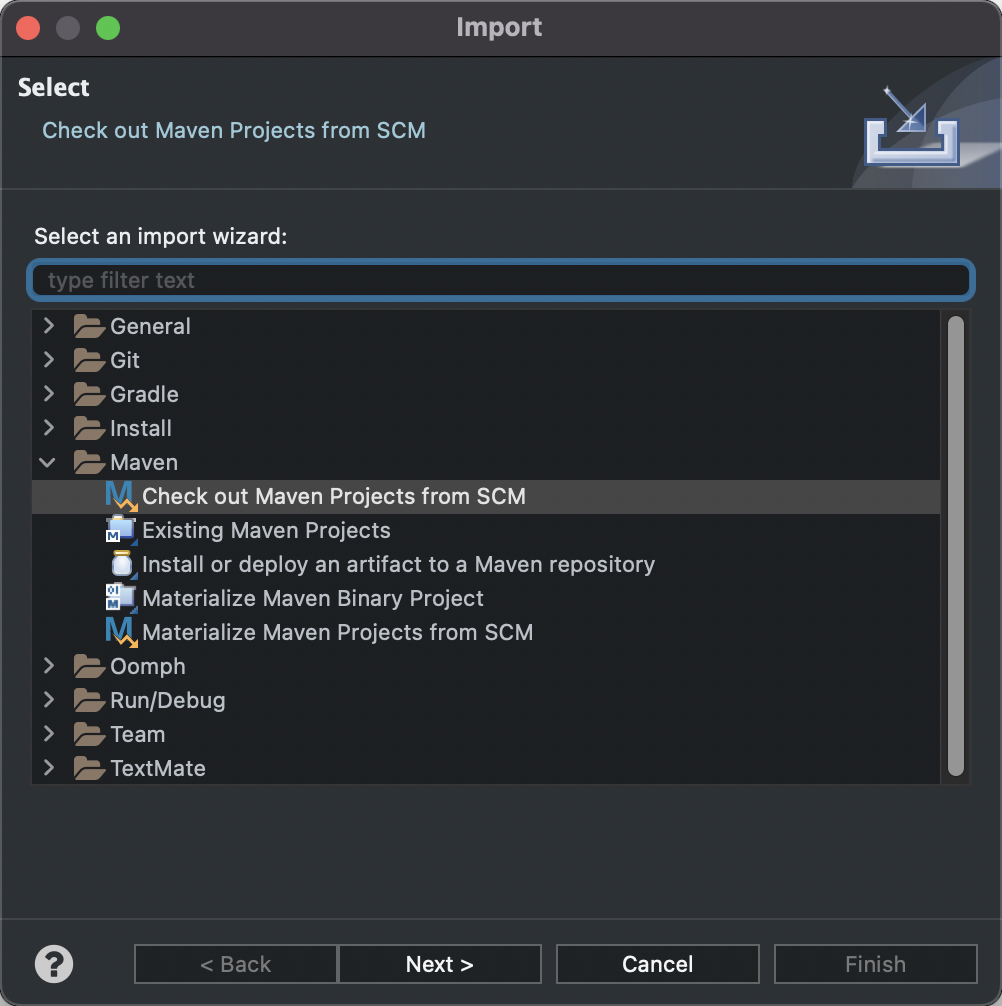
Click Next and enter the Git URL for the Project Repository. (e.g. https://chadjk@bitbucket.org/gisfederal/kinetica-jdbc-demo.git)

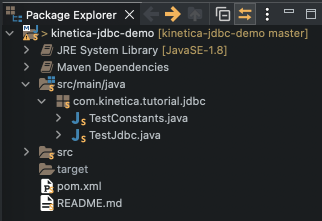
After the import is complete you should see the fully compiled project in the Package Explorer.
JDBC Connector Dependency
The project will retrieve the Kinetica JDBC Library from the Kinetica Maven Repository. For this to happen the repository must be defined in the pom.xml.
<repository>
  <id>kinetica-releases</id>
  <name>Releases</name>
  <url>https://nexus.kinetica.com/repository/releases</url>
  </repository>
  <repository>
  <id>kinetica-thirdparty</id>
  <name>Snapshots</name>
  <url>https://nexus.kinetica.com/repository/snapshots</url>
</repository>
Below is an example of the Maven dependency. You should check the repository for the latest version.
<dependency>
  	<groupId>com.kinetica</groupId>
  	<artifactId>kinetica-jdbc</artifactId>
  	<version>7.1.5.0</version>
</dependency>
Additional JDBC Connector resources resources are available:
- See the Kinetica JDBC Connector Guide.
- As an alternative you can download the JAR from the Kinetica Client JDBC Repository.
Running the Examples
The example code is provided as JUnit tests. Before you can run them you must configure the connection.
Open the file /kinetica-jdbc-demo/src/main/java/com/kinetica/tutorial/jdbc/TestConstants.java and edit the below parameters with your own connection parameters.
public static final String URL = "jdbc:kinetica://hostname:9191";
public static final String USER = "admin";
public static final String PASS = "???";
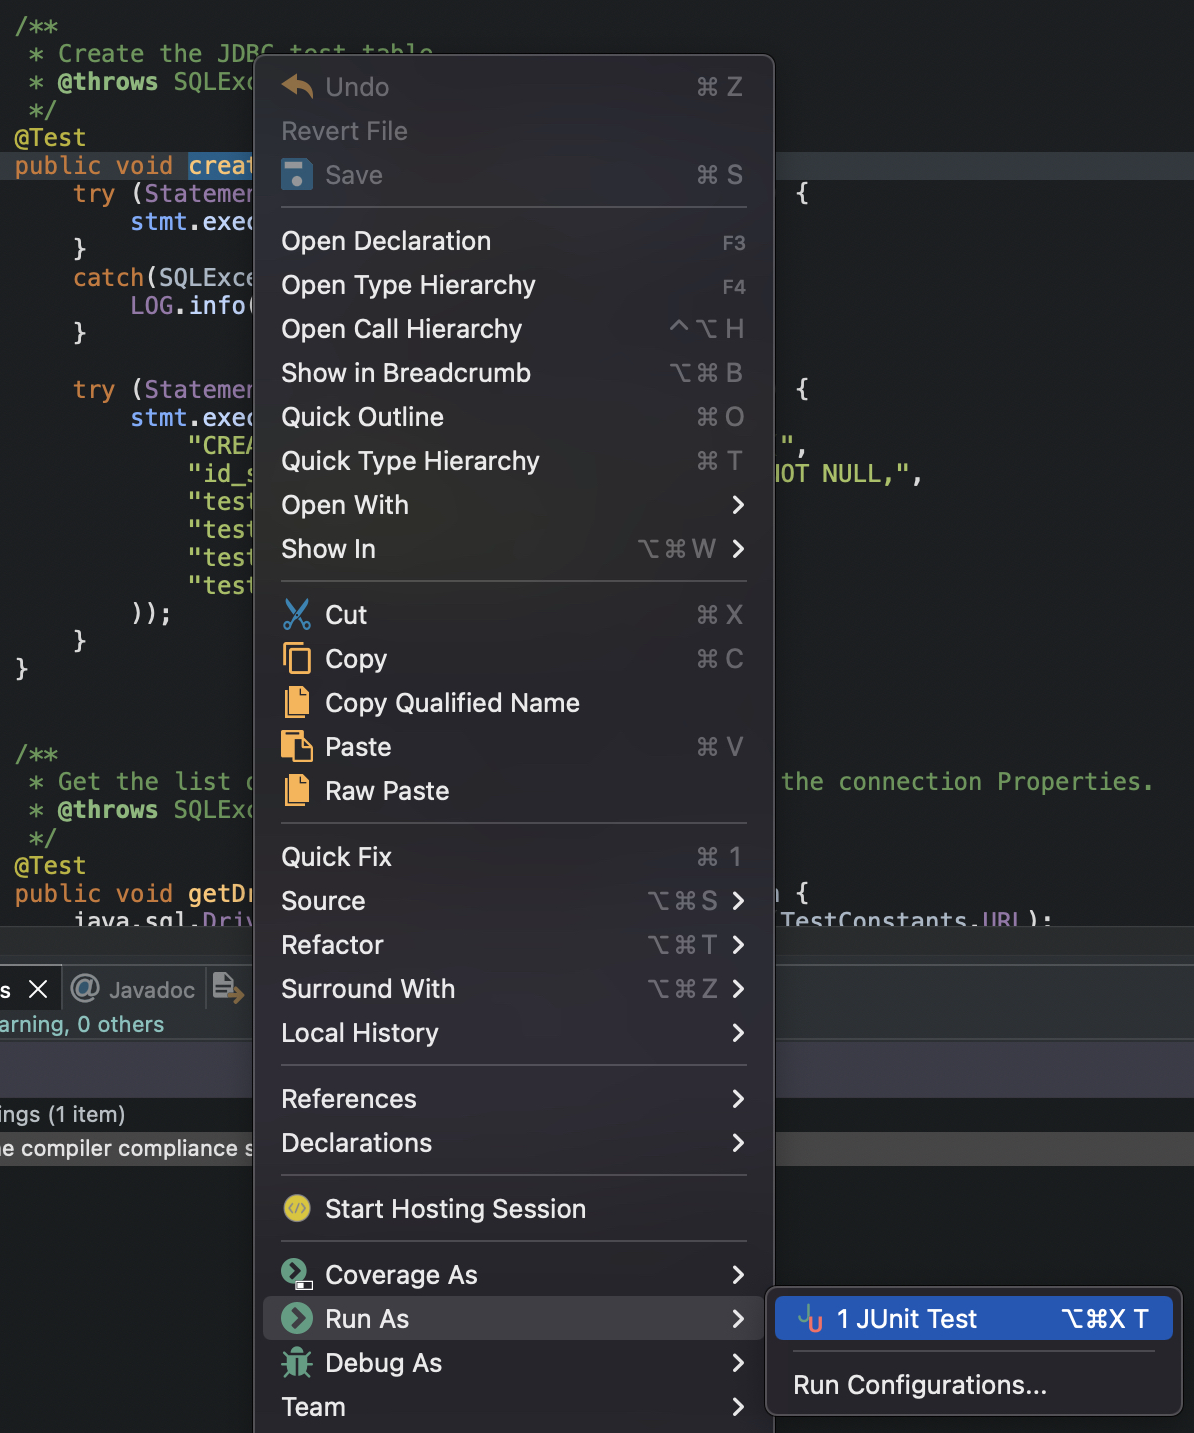
Open the file /kinetica-jdbc-demo/src/main/java/com/kinetica/tutorial/jdbc/TestJdbc.java, right click on the createTable() test case, and select Run As -> JUnit Test.
In the log you should see the below results indicating that a table TEST.jdbc_test was successfully created.
15:11:29.191 [main] INFO com.kinetica.tutorial.jdbc.TestJdbc - Driver: Kinetica (7.1.5.0.20211003151634)
15:11:29.194 [main] INFO com.kinetica.tutorial.jdbc.TestJdbc - Connected to Kinetica (7.1.5.4.20211104153843)
15:11:29.197 [main] INFO com.kinetica.tutorial.jdbc.TestJdbc - SQL: CREATE SCHEMA TEST
15:11:29.529 [main] INFO com.kinetica.tutorial.jdbc.TestJdbc - Schema already exists
15:11:29.529 [main] INFO com.kinetica.tutorial.jdbc.TestJdbc - SQL: CREATE OR REPLACE TABLE TEST.jdbc_test (
id_str VARCHAR (16, primary_key, dict) NOT NULL,
test_long BIGINT,
test_date DATE NOT NULL,
test_timestamp TIMESTAMP NOT NULL,
test_datetime DATETIME NOT NULL )
15:11:29.928 [main] INFO com.kinetica.tutorial.jdbc.TestJdbc - All done!
Example Table
The test case createTable() created a schema and table that will be used by the examples in the following sections. The full DDL is shown below.
CREATE TABLE "TEST"."jdbc_test"
(
  "id_str" VARCHAR (16, primary_key, dict) NOT NULL,
  "test_long" BIGINT,   “test_int” INTEGER,
  "test_date" DATE NOT NULL,
  "test_timestamp" TIMESTAMP NOT NULL,
  "test_datetime" DATETIME NOT NULL
)
We will take a close look at the column definitions and understand how they are represented in Kinetica. More information is available in Data Definition (DDL).
| Column Name | SQL Type | Java Type | Description |
| id_str | VARCHAR(16, dict) | String | 16 byte string using dictionary compression. |
| test_long | BIGINT | Long | 8 byte integer |
| test_int | INTEGER | Integer | 4 type integer |
| test_date | DATE | LocalDate | 4 byte date with accuracy of day |
| test_timestamp | TIMESTAMP | Instant | 8 byte type with accuracy of milliseconds |
| test_datetime | DATETIME | Instant | 8 byte type with accuracy of milliseconds |
The id_str column is also the primary key for the table so duplicate entries will be prevented.
The datatypes TIMESTAMP and DATETIME appear identical for JDBC operations. The key difference is that TIMESTAMP is passed to the application as an integer while DATETIME is passed as a formatted string. This means that TIMESTAMP can reduce CPU and network load but it leaves formatting up to the application.
The JDBC API
Connecting
When a JUnit test case is started it will first invoke com.kinetica.tutorial.jdbc.TestJdbc.setUp() which contains the code to establish the JDBC connection. The resulting connection object is saved in this.dbc.
First the Kinetica driver must be registered with the JDBC Framework. We load the driver static class which will force it to register itself. Many other examples will show this driver being dynamically loaded.
Class _class = com.kinetica.jdbc.Driver.class; Next we create a container for the parameters. The TestConstants object contains the connection parameters from the previous section.
Properties props = new Properties();
props.put("UID", TestConstants.USER);
props.put("PWD", TestConstants.PASS);
Finally we pass the URL and properties to create the Connection.
this.dbc = DriverManager.getConnection(TestConstants.URL, props);Don’t forget to close the connection after the operations are complete.
this.dbc.close();Inserting rows
The PreparedStatement class is used for executing DML statements like INSERT, UPDATE, and DELETE. As an alternative you could use Statement but it is not parameterized and is at risk of SQL injection attacks.
The insert test is performed by TestJdbc.testInsert(). There are multiple API’s that can be used to insert rows; however, it is a best practice to use PreparedStatement because it is safe from SQL injection attacks.
We first define a parameterized SQL template. The hint KI_HINT_UPDATE_ON_EXISTING_PK indicates that if the row being inserted is already in the PK then it will be updated. Without this hint the duplicate row would be ignored.
private final static String[] SQL_INSERT = {
        "insert into TEST.jdbc_test",
        "/* KI_HINT_UPDATE_ON_EXISTING_PK */",
        "(id_str, test_long, test_date, test_timestamp, test_datetime)",
        "VALUES(?, ?, ?, ?, ?)"
};
We open a try block to create the PreparedStatement. The try block will guarantee that the statement is automatically closed. If you don’t use the try block then you need to remember to call PreparedStatement.close() in all cases or you could leak resources.
try (PreparedStatement pstmt = this.dbc.prepareStatement(sql(SQL_INSERT))) {
You populate the row by calling the various set() functions in PreparedStatement. The index relates to the position of the “?” in the statement where the index starts with 1.
int pos = 1;
pstmt.setString(pos++, "AAA");
To insert a date or timestamp you will need to convert it to java.sql.Timestamp or java.sql.Date which are specialized JDBC classes. In the example below we use setTimestamp() for the TIMESTAMP and DATETIME DDL types.
Timestamp tsNow = Timestamp.from(Instant.now());
Date dateNow = Date.valueOf(LocalDate.now());
pstmt.setDate(pos++, dateNow);pstmt.setTimestamp(pos++, tsNow);pstmt.setTimestamp(pos++, tsNow);
Finally we call executeUpdate() to insert a single row.
int rowsAffected = pstmt.executeUpdate();
Updating Rows
The UPDATE operation works similar to INSERT except that we provide a different statement and set of parameters.
private final static String[] SQL_UPDATE = {
        "update TEST.jdbc_test SET",
        "test_long = ?, test_int = ?",
        "where id_str = ?"};
There are 3 parameters in this statement where the last one indicates the key of the row to update.
int pos = 1;
pstmt.setLong(pos++, 99);
pstmt.setInt(pos++, 99);
pstmt.setString(pos++, "AAA");
Note: Since this table has a PK we could use the KI_HINT_UPDATE_ON_EXISTING_PK hint along with insert as a faster alternative.
Bulk Operations
Executing statements one at a time is not very efficient and so PreparedStatement provides a means of grouping operations together for bulk execution. You can run this example with TestJdbc.testInsertBatch().
First use try to create a PreparedStatement. In this example we re-use the INSERT statement from the earlier example.
try (PreparedStatement pstmt = this.dbc.prepareStatement(sql(SQL_INSERT))) {
Next we loop through each row and call addBatch(). This operation will prepare the row for the bulk insert.
for(int idx = 0; idx < rowsToInsert; idx++) {
      [set operations...]
      pstmt.addBatch();
}
Finally we call executeBatch() to insert the rows. The Kinetica driver, by design, returns only a total of the rows inserted. This could be different then the number of rows you added if some of them failed to insert because of constraint violations so you should always check.
int[] results = pstmt.executeBatch();
int rowsAffected = results[0];
To find out why some rows failed you can check the warnings.
SQLWarning warnings = pstmt.getWarnings();
if(warnings != null) {
    LOG.warn("Got warnings: {}", warnings);
}
Executing Queries
This example will show how to perform a query using java.sql.PreparedStatement.executeQuery(). We could use java.sql.Statement.executeQuery(String) but parameters in the statement could be at risk for SQL injection. You can run this example with TestJdbc.testQuery().
First we define a parameterized statement.
final String sqlSelect = sql(
      "SELECT id_str, test_long, test_date, test_timestamp, test_datetime",
      "FROM TEST.jdbc_test",
      "WHERE test_long >= ?",
      "ORDER BY id_str");
We create the PreparedStatement and set the parameter for the where predicate.
try(PreparedStatement pstmt = this.dbc.prepareStatement(sqlSelect)) {
  int pos = 1;
      pstmt.setLong(pos++, 3);
Next we call executeQuery() to create the result set inside the try block. If we did not use the try block then we would need to call ResultSet.close().
try(ResultSet rs = pstmt.executeQuery()) {
Finally we loop through the results and call the appropriate get() function for the column index.
while(rs.next()) {
    pos = 1;
    String idStr = rs.getString(pos++);
    Long testLong = (Long)rs.getObject(pos++);
    Date testDate = rs.getDate(pos++);
    Timestamp testTimestamp = rs.getTimestamp(pos++);
    String testDatetime = rs.getString(pos++);
}
Note that the test_timestamp and test_datetime columns can both be fetched with getTimestamp() or getString().
Troubleshooting
When opening the connection you can optionally enable debug logging. We enable this by specifying the log level and path in the connection properties.
LogLevel DRIVER_LOG_LEVEL = LogLevel.INFO;
props.put("LogLevel", Integer.toString(DRIVER_LOG_LEVEL.ordinal()));
props.put("LogPath", "./logs");
This will log results to the file ./logs/KineticaJDBC.log. You should see output that looks something like the below example.
Mar 04 16:51:37.788 INFO  1 com.simba.jdbc.common.BaseConnectionFactory.getConnection: Driver Version: 7.1.6.1.20220222132047
Mar 04 16:51:37.860 INFO  1 com.kinetica.jdbc.core.KiConnection.connect: Setting allowHostMismatch=0
Mar 04 16:51:37.878 INFO  1 com.kinetica.jdbc.core.KiConnection.connect: Connecting to URL: http://172.31.32.7:9191
Mar 04 16:51:38.883 INFO  1 com.kinetica.jdbc.core.KiConnection.connect: GPUdb Connecting...
Mar 04 16:51:38.884 INFO  1 com.kinetica.jdbc.core.KiConnection.connect: #### showSystemProperties({'properties' : 'conf.require_authentication,version.gpudb_core_version'})
Mar 04 16:51:39.015 INFO  1 com.kinetica.jdbc.core.KiConnection.connect: GPUdb Connected
Conclusion
We appreciate the time you have taken to complete this tutorial. The below links provide additional resources exploring Kinetica and JDBC functionality.
Kinetica Resources:
- Kinetica JDBC Driver Download
- Kinetica SQL Guide
Core JDBC Resources:
Making Sense of Sensor Data
